
Find Store configuration
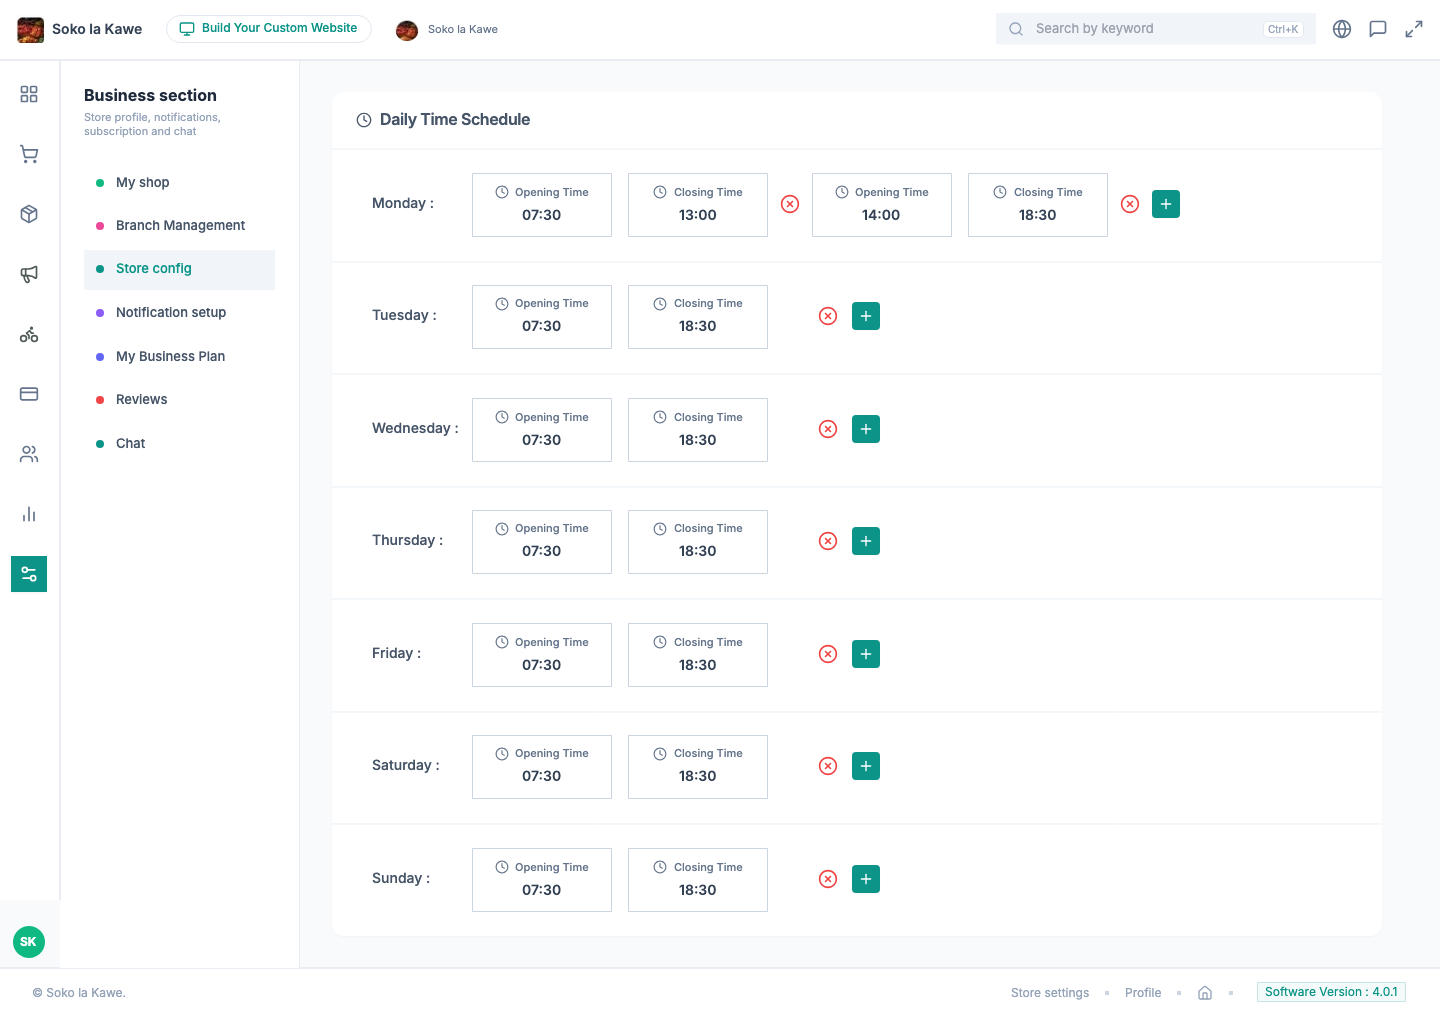
In the vendor dashboard, open Business settings → Store setup/Store configuration. In Soko Store, open the store settings/configuration area. Some controls appear only when enabled for the store and its package. Save each settings section after changing it.
Set a different schedule for each day
- Find Daily time schedule.
- Choose the day and add a start and end time.
- Save the time range. Repeat for each working day.
- For a lunch or prayer break, add two separate ranges on that day: for example 08:00–12:30 and 14:00–20:00.
- Remove a range using its delete control if the hours change. A day with no range has no scheduled opening hours.
Time ranges must end after they start and must not overlap. Enter an overnight opening as separate ranges on the two calendar days rather than an end time earlier than its start time. Check the resulting customer view, especially near midnight.
The schedule determines when the shop is open for normal ordering. It lets you run different weekday and weekend hours without remembering to switch the store every morning.
Temporarily close, then reopen
Use the store’s open/temporarily closed control when you cannot accept orders, such as during an unexpected power interruption or stock count. Re-enable it when ready.
The manual switch and the weekly schedule are separate. Reopening removes the temporary closure; it does not rewrite your hours or guarantee the shop will accept immediate orders outside them. If you intend to trade later tonight, update today’s schedule as well and check the customer view. Closing the shop does not fulfil or cancel orders already accepted.
Order and delivery controls
Scroll sideways to compare all columns.
| Control | What it does and how to use it |
|---|---|
| Delivery | Allows delivery orders for your store. Keep your rider arrangements ready before turning it on. |
| Take away | Allows customers to collect an order themselves. Set a clear pickup location. |
| Scheduled order | Allows customers to choose a supported future ordering time. Opening hours and available checkout slots still apply. |
| Order place to schedule interval | Minimum preparation lead time for a scheduled order. It is not the shop’s weekly opening schedule. |
| Prescription order | Where enabled for pharmacies, lets customers send a prescription request for the store to review and price. See the separate workflow. |
| Minimum order | The basket threshold customers must meet. Set it with picking and packing effort in mind. |
| Approximate delivery time | The displayed minimum/maximum estimate and unit. Update it when the team’s capacity changes. |
| Free delivery | Lets eligible orders avoid a delivery fee. Your delivery still has a cost, so plan how to fund it. |
| Free delivery distance | Restricts store-funded free delivery to a distance in kilometres. An empty or zero limit is not a short radius; it represents no positive distance restriction. |
| Minimum delivery charge | The lowest normal delivery fee. |
| Per km delivery charge | The rate multiplied by the delivery distance; the minimum is then applied as a floor. |
| Maximum delivery charge | A positive cap on the normal charge. It must make sense alongside the minimum. See the worked examples. |
Stock, packaging and business information
Scroll sideways to compare all columns.
| Control | What it does |
|---|---|
| Show low stock count | Displays low-stock information to customers when enabled. Keep the stock figures accurate. |
| Minimum stock for warning | The threshold at which products appear as low stock, helping the team plan replenishment. |
| GST status and number | Displays the configured business tax information. Use the details that apply to your business. |
| Extra packaging status and amount | Where offered, enables a separately configured packaging charge. Make its purpose clear to customers and check the final order total. |
| Website builder status | Enables the store’s website setup when the package and platform allow it. |
| Store metadata | The store’s title, description and image for search and sharing. Describe the shop and location naturally. |
Save your first working setup
- Write down the days and hours you actually accept orders, your preparation time and the delivery fees agreed with your rider.
- Set the order options you will offer. Enable customer collection only if staff can handle it at the shop.
- Enter minimum basket and delivery settings using the explanations above. Save that section.
- Add and save the daily time ranges. A saved price does not also save an unfinished schedule form.
- Set stock warnings so your team knows when to replenish. Enter packaging or business-information fields only where relevant, then save their sections.
- Leave the page and reopen it to confirm the values remained saved. Then check the shop from a customer account with a delivery address selected.
Example schedule: Monday 08:00–12:30 and 14:00–20:00 means two opening periods, with a break between them. It does not mean the shop is open continuously from 08:00 to 20:00. Configure Tuesday separately if its hours differ.
If the shop still looks closed
Check the selected branch, today’s saved hours, temporary-closure control, subscription and approval status. In the customer view, also check the delivery address and selected category. If these appear correct, tell support the store name, day/time and message shown. Do not keep changing unrelated settings to try to reopen it.
A useful final check
Open your shop as a customer. Check the opening state, delivery availability, minimum basket and a nearby delivery address. Repeat with a more distant address before announcing free delivery. Understand delivery prices and set up notifications before sharing the store widely.